Coordinate entry

|
The following two actions can be accessed in the task window “Coordinate entry”. •Go to coordinates •Drawing |
Go to coordinates |
With “Go to coordinates” any desired position in the map can be accessed and marks can also be set optionally. |
|
|
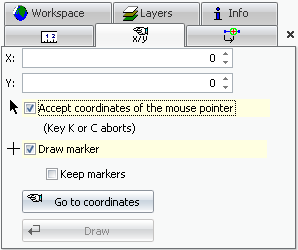
Coordinate entry |
The desired X and Y coordinates can be entered in the following way: 1.Direct entry in fields X and Y. 2.Coordinates are extracted from the map by the mouse pointer. |
|
When using the second option, the coordinates are changed in the entry fields with each movement of the mouse pointer. This action is interrupted with the key “K” or “C” and the coordinates at the time of cancellation are entered in the coordinate entry fields. |
|
By clicking on “Go to coordinates”, the user can zoom in on the map and go to the defined coordinate position. |
Set mark |
If the option “Set mark” is enabled, a mark is set on the marking level at the coordinate position and the mark from the previous step is deleted. If the “Keep marks” option is also enabled, all previously set marks are kept. |
|
|
Drawing via coordinates |
The action “Drawing” makes it possible to draw on the map via the entered coordinates in the window “Coordinate entry”. By clicking on “Drawing”, a mouse click in the map is simulated in the defined position. |
|
|
|
This action is explained in detail for the drawing of a polyline in the following: |
|
1.In the toolbar “Tools”, go to “Drawing” and select “Polyline”. 2.Define the insert level on which the polyline will lie. 3.Definition of start point: Enter the start coordinates of the polyline, either directly or via the mouse pointer; cancel with the“K” or “C” key in the required position. 4.Enter the coordinates of the next point (1st coordinate) and click on “Draw”: A mouse click is simulated in this position of the map and a line is drawn. 5.Enter the coordinates of the next point (2nd coordinate) and click on “Draw”,… 6.A polyline is created like the one shown in the picture below. 7.To finish, select the item “Select and edit” in the toolbar “Tools” and edit the line, e.g. allocate to a ConnectMaster element. |