Global Settings

The following XML-part shows a sample configuration of the project
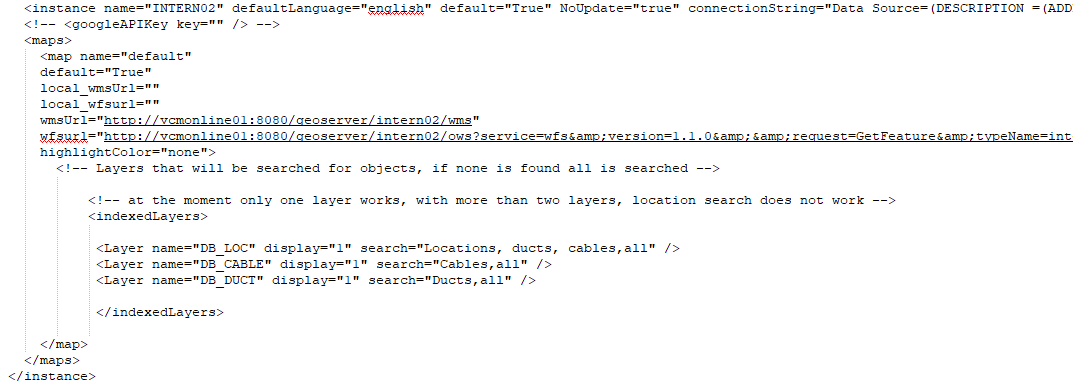
<instances>
<companylogo value="../Images/logo1.png" />
<epsg value="EPSG:3857" />
<instance name="cmo1" displayname=”Production_INTERN01” defaultLanguage="english" default="false" NoUpdate="false"
connectionString="Data Source=(DESCRIPTION =(ADDRESS_LIST =(ADDRESS = (PROTOCOL = TCP)(HOST = vWEBAPPDB01.ddag.ch)(PORT = 1521)))(CONNECT_DATA =(SERVICE_NAME = WAPP0103)));
User Id= @UserID@;Password=#Password#;Persist Security Info=True;" >
<googleAPIKey key="xxx” />
<maps>
<map name="default" default="True" local_wmsUrl="" local_wfsurl="" wmsUrl="http://vwebapp01:8080/geoserver/cmo1/wms" wfsurl="http://vwebapp01:8080/geoserver/cmo1/ows?service=wfs&version=1.1.0&&request=GetFeature&typeName=cmo1:" highlightColor="none">
<!-- Layers that will be searched for objects, if none is found all is searched -->
<indexedLayers>
<Layer name="LAYER1" display="1" search="All" />
<Layer name="LAYER2" display="1" search="All" />
<Layer name="LAYER3" display="1" search="All" />
</indexedLayers>
</map>
</maps>
</instance>
</instances>
IMPORTANT: BE aware that you MUST define the search for each layer e.g. location, cable, duct,..!
Otherwise the zoom to location will not work.
Configurations:
•Instances: ConnectMaster Online supports multiple database instances on the same installation. The instances tag is the root for the instance configuration.
•Company Logo: the value attributes defines the path to a custom graphic element to replace the ConnectMaster logo on the login screen.
•Epsg: Defines the EPSG code or projection that need to be written into ConnectMaster when storing coordinates.
•Instance: For each instance you configure you need to setup an instance tag.
oName: The name to be displayed in the DB: dropdown on the login screen.
odefaultLanguage: Is the default language to be selected when logging into in instance. Options are: English, German, French
odefault: If set to True the instance will be pre-selected when you enter the login screen. If multiple instance has the option set to True, then the first one will be pre-selected.
oNoUpdate: If NoUpdate is set to True, All functions that update or edit data in the database is turned off – no matter which user right role you have.
oconnectionString: The connectionString defines the path to the database and consists of 4 parts seperated by semi-colon. The first part is the data source and can be copied directly from your tnsnames.ora file from your oracle installation. The next 3 parts (User id, Password, Persist Security Info) will always be the same User Id= @UserID@;Password=#Password#;Persist Security Info=True;
•GoogleAPIKey: Holds the Google API key to enable integration with the Google API. If the key is not available all Google API functions will be disabled.
•Maps: Is a container for each map configuration. (Version 1.0 only supports one)
•Map: For each map you configure you need to setup an map tag.
oName: Name of the map
oDefault: If set to True the map will be the default map when opening the application.
oLocal_wmsUrl: Define the path to the WMS when looking from the server (Only needed if it differs from the wmsURL)
owmsURL: Define the path to the WMS when looking from the client
olocal_wfsurl: Define the path to the WFS when looking from the server (Only needed if it differs from the wfsURL)
owfsURL: Define the path to the WMS when looking from the client
oHighlightColor: Defines the line highlight color on the map, default is red.
•IndexedLayers: Between the indexedLayers tags you define your workspace. If the IndexedLayers are missing or empty the system will try to display and search in everything on the WMS/WFS url.
•Layer: For each WMS/WFS layer a layer tag is created. The order of the layers are defined be the order they are written in the indexedlayers tag.
oName: The name of the layer as configured on the WMS/WFS.
oDisplay: 1 is displayed, 0 is hidden. (Hidden layers can still be searched)
oSearch: Defines which entity types that can be found on the layers. A good presice configuration of each layer will ensure fast results on the client. The options can be: All, None, Locations, Components, Cables, Containers, CopperTerminals, Ducts, EndDevices, Joints, NetworkElements, NetworkInterfaces, Panels, Manholes, PhysicalPaths, Signals, TransportContainers. Multiple options can be seperated by comma.